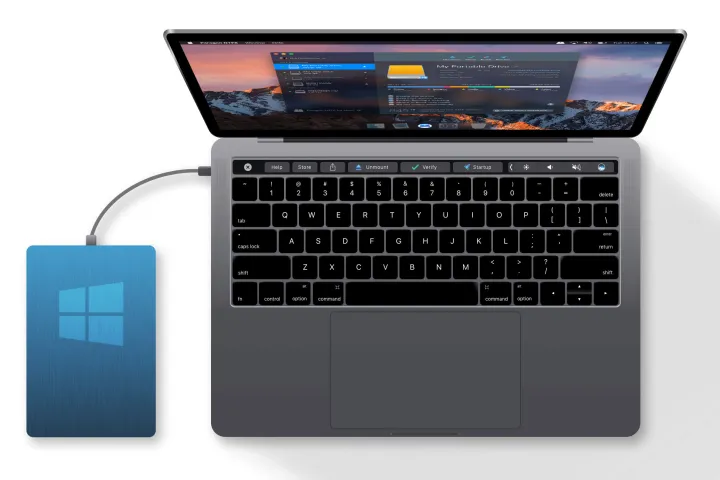
How to share an external hard drive between Mac and Windows
Although compatibility concerns between Microsoft’s Windows and Apple’s MacOS have decreased significantly over time, this does not indicate that they have vanished entirely. If you acquire a new external hard drive today, you may find that transferring files between the two is a tedious procedure. So, how to share an external hard drive between Mac and Windows?
There is, however, a remedy. You may divide your hard drive into various regions with distinct rules and functionalities by “partitioning” it. You may partition your disk in this situation such that part of it is compatible with MacOS and part of it is compatible with Windows. Both computers offer the tools you’ll need to partition a new disk once it’s attached.
DIFFICULTY
Moderate
DURATION
20 minutes
YOU NEED
- Mac or Windows PC, or laptop
- External drive

It’s a specialized scenario with a split
A fast Google search may lead you to assume that formatting the entire drive with Extensible File Allocation Table, or exFAT, is the appropriate option to take. If every file you save is less than 4GB in size, it’s a simpler, universal technique. However, this format does not allow bigger files, which makes transferring 4K films and other large files between Macs and Windows 10 PCs difficult.
Meanwhile, while Windows 10’s NTFS file system allows huge files, MacOS cannot read this format natively. This puts you in an odd situation, as any file transferred between the two systems must be 4GB or smaller. If you wish to save bigger files, you’ll need to establish a second, dedicated place and use a MacOS (Extended) or Windows 10-compatible format (NTFS).
With this in mind, our approach divides the external drive into two sections: one core sector for data greater than 4GB, and a secondary portion for file sharing between Windows and Macos 10. It’s not the ideal option — we understand — but it gets the job done.
Before you start, pick a primary format that you’ll utilize the most: If you generally use a Mac with a secondary exFAT disk, choose MacOS Extended; if you mostly use Windows 10 with a secondary exFAT partition, choose NTFS.
Finally, formatting wipes the disk clean of any data. Before you begin the formatting procedure, make a backup of anything crucial. If you need assistance, we offer guidelines for Windows and MacOS.
Windows 10 allows you to partition your disk drive
Here’s a thorough guide on completing the procedure from Windows 10. But first, let’s go through the methods you’ll need to swiftly partition the drive while working in Windows. In Windows, the procedure is a little more complicated than on a Mac, but it’s now easier than ever.
1: From the Power User menu, right-click on the Start button and select Disk Management.
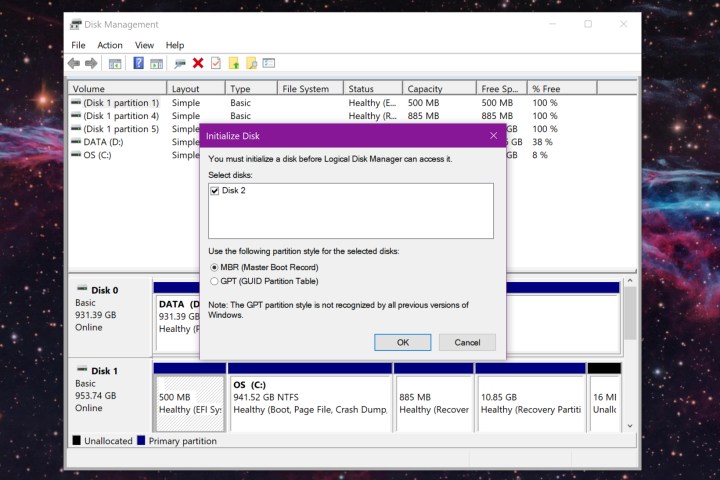
Disk 1 represents your PC’s primary boot disk (C:), which contains Windows and other applications. Disk Management installs a secondary “data” disk (D:) to your PC called Disk 0. If you don’t have any additional internal disk-based storage, Windows 10 will identify an external drive as Disk 2 and the following alphabetic label. Windows 10 displays optical drives in a unique way.
External drives are usually formatted right out of the box. When connecting the device to your PC, however, you may get a “Not Initialized” problem. This indicates that it is not formatted properly for use with Windows. It won’t even have a drive letter assigned to it in File Explorer (This PC), and it might not even have enough capacity to save data.
Windows 10 allows you to partition your disk drive cont’d
The Master Boot Record (MBR) & GUID Partition Table formats are available in the Initialize Disk pop-up box (GPT). The former is older and then only supports sizes of up to 2TB, although it is backwards compatible with previous Windows versions. GPT is a newer format that allows for higher storage capabilities, however it is incompatible with previous Windows versions.
To proceed, select the partition style & click the OK button. If the pop-up was mistakenly closed, right-click on the listed disk and choose Initialize Disk from the pop-up menu.
Continue to Step 2 if you didn’t get the pop-up warning.
2: On the pop-up menu, right-click on the unallocated space and select New Simple Volume, as shown below.

3: The New Simple Volume Wizard appears on the screen. Then press the Next button.

4: Divide the given physical number in half because we’re making two divisions. To proceed, type that figure into the area next to Simple Volume Size in MB then click Next. We’re partitioning a 1TB SanDisk Ultra solid-state drive in this instance.
5: Use the drop-down menu to manually assign a drive letter or let the Wizard do it for you. To continue, click the Next button.
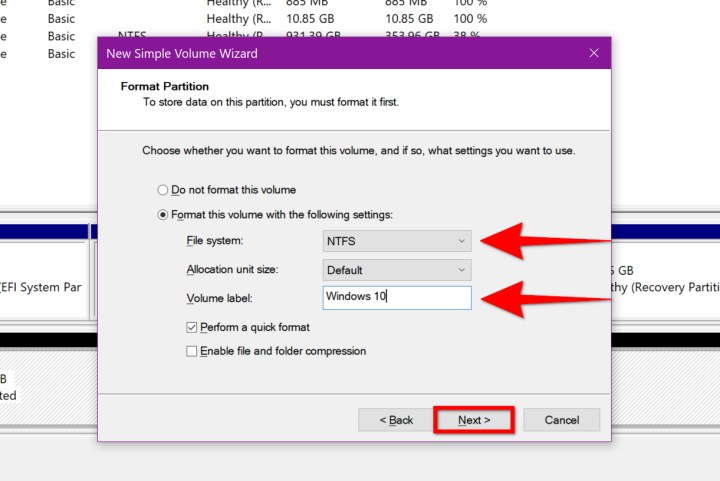
6: Pick a file system to work with. Use NTFS since your primary PC is running Windows 10. Also, give this partition a volume label (drive name — we chose “Windows 10,” but you can call it whatever you want). To continue, click the Next button.
7: To finish, click the Finish button.
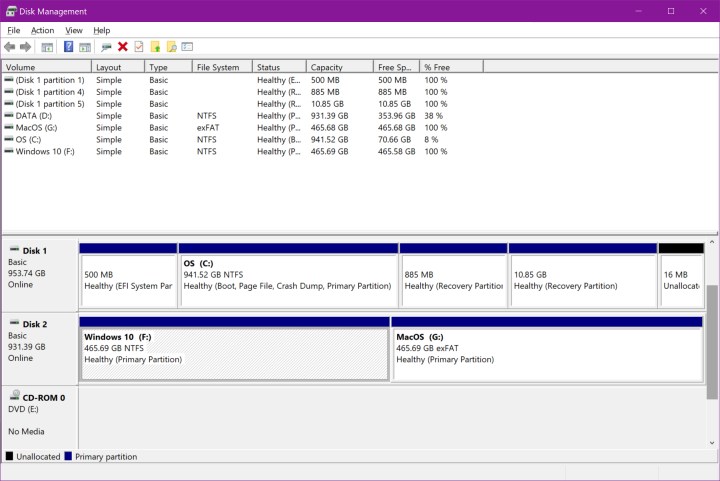
The external disk should appear in Disk Management as one new volume — in our case, “Windows 10” — and a second section with unallocated space.
Rep steps 1–6 using a right-click on the unallocated area. However, this time, at step 6, choose exFAT as the file system, which you’ll use to exchange files with MacOS. It’s worth noting that there’s no need to define a volume size.
The end product should look like this:
In MacOS Big Sur, partition the disk
In MacOS, partitioning an external disk isn’t nearly as difficult. You’ll need to create two partitions if your external disk doesn’t already have them. You can skip to step 5 if the disk already contains a Mac-friendly partition.
Because the drive’s file system isn’t “readable,” you could get a “initialize” error at first. To establish your first suitable partition, click the Initialize button on the little pop-up screen and proceed to step 5. Start with step 1 if the error does not display.
We used the identical SanDisk SSD here, but MacOS utilized the name of the Seagate USB adaptor rather than the drive’s real name (the adapter came from an external Seagate drive). The only substantial differences between Catalina and the rest of the instructions are the cosmetic modifications to the UI and how internal volumes are listed.
1: Select Finder from the menu bar, then select Go from the drop-down menu, followed by Utilities from the drop-down menu.
2: In the next window, double-click the Disk Utility icon.
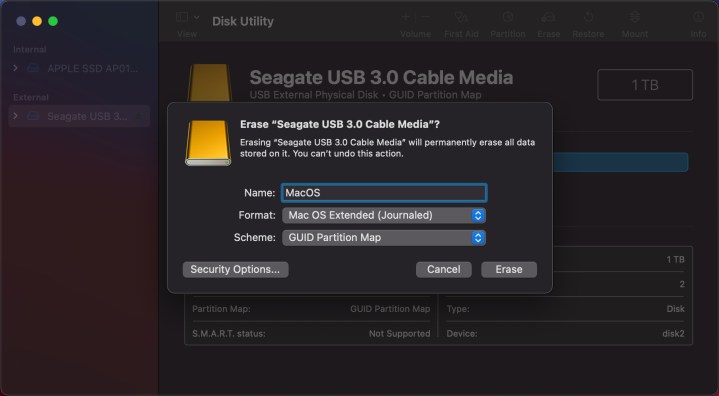
3: Open Disk Utility and look for your disk under External on the left. As illustrated below, click Erase on the app’s top toolbar.

4: In the pop-up box that appears, type a name. As the format, choose MacOS Extended (Journalist) and the scheme, GUID Partition Map.
5: To make these adjustments, click the Erase button.
In MacOS Big Sur, partition the disk cont’d
6: Your hard disk should now have a single partition. In Disk Utility, select the disk once more and then click Partition at the top.
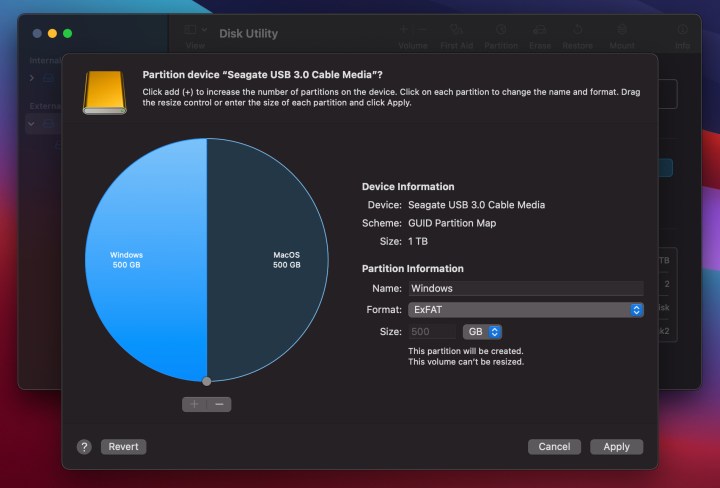
7: To create a second partition, click the little Plus button situated under the blue pie chart on the following pop-up (it will not move).
8: The pie graph is sliced along the center by a second part. Select the exFAT format and give the volume a name (we went with Windows).
9: To add the new partition, click the Apply button.
10: To finish the procedure, click the Partition button in a new pop-up window.
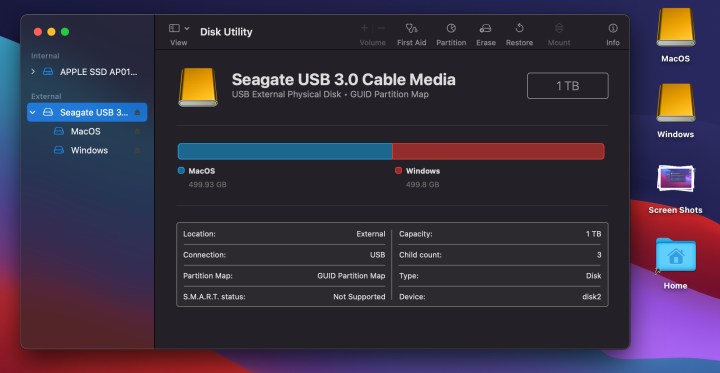
11: When you’re finished, click the Done button.
The end product should like the image below. On your desktop, two icons representing each drive should appear, as illustrated.
It’s worth noting that the exFAT file system isn’t completely trustworthy, so connect your hard drive to a Windows computer and format a secondary Windows partition to NTFS. Our in-depth explanation of this may be found in the Windows section.
Notes on the End
Partitioning a hard disk isn’t difficult, regardless of whether you’re using Windows or a Mac, as you can see. You may also activate NTFS read/write functionality on your Mac by installing a commercial product like Paragon’s Microsoft NTFS software or the open and free Tuxera.
Keep in note that some functions, such as Time Machine, will not work properly with an NTFS file system, even if you use third-party applications.
Read more:
How to use Nearby Sharing to transfer files between PCs in Windows 10
9 things you must know when switching from Windows to Mac